
In this RAD Server CRUD Procedures – Part 1 post, we will discuss the the default generated CRUD procedure implementations from the RAD Server Package Wizard.
In the RAD Server CRUD Procedures – Part 2 post, we will discuss modifying the default generated CRUD procedure implementations from the RAD Server Package Wizard using both Delphi and C++ Builder, to show possible ways to implement Get, GetItem, Post, Put and Delete, including Delphi and C++ Builder clients to call the CRUD procedures.
In the RAD Server CRUD Procedures – Part 3 post, we will discuss implementing a Multi-Device FireMonkey (FMX) REST client to call and interact with the RAD Server CRUD procedures.
Create, retrieve, update and delete (CRUD) refers to the four major functions implemented in database applications. The CRUD functions are the user interfaces to databases, as they permit users to create, view, modify and alter data. CRUD works on entities in databases and manipulates these entities.
These four methods create, retrieve, update and delete are re-used across all types of objects.
So, for example, you can create new Employees, read Employees, update Employees, and delete Employees.
These four CRUD methods are also reflected in the way HTTP functions with these four methods; GET, POST, PUT, and DELETE.
The HTTP methods POST, GET, PUT and Delete are typically translated as CREATE, READ, UPDATE, and DELETE, respectfully.
This offers us the uniform interface that’s required as part of a REST application, as the well understood CRUD pattern.
In order to transfer data to and from a REST Service, JSON – JavaScript Object Notation, is typically used as the transfer encoding.
The Embarcadero RAD Server (also known as EMS – Enterprise Mobility Server) uses the industry standards of REST, and you can build any client front-end that you want for your RAD Server application. And any tool that can consume JSON via HTTP can be used to build a RAD Server client, such as Delphi and/or C++ Builder VCL or FMX application, PHP, Javascript, Angular, C#, whatever – it doesn’t matter. As the graphic below shows, you can leverage almost anything to consume a RAD Server (EMS) service:

Let’s now take a look at implementing CRUD procedures using RAD Studio, Delphi and/or C++ Builder in a RAD Server EMS Resource Module. Specifically, we’ll look at how to create and implement the RAD Server Endpoints for GET, POST, PUT and DELETE.
For this implementation, I’m using the Delphi 10.4.2 IDE.
For the Employee Table, I’m using the InterBase Employee database, located at:
localhost:C:UsersPublicDocumentsEmbarcaderoStudio21.0Samplesdataemployee.gdb
Steps:
1. File | New | Other | Delphi Projects | RAD Server (EMS) | RAD Server Package

2. This gives us the RAD Server Package Wizard, allowing me to (1) Create empty package, or (2) Create package with resource.

The option (1) Create empty package, creates an empty package allowing you to add resources later.
Or option (2) Create package with resource, creates for me a package with an existing resource. This option (2) lets the IDE do some of the work for me, by creating a template resource for me. So we will select this Option (2) ) Create package with resource.
3. Click Next.

Here, we see an entry for Resource name. In RAD Server the terminology of a Resource is a Collection. So, for example, we can have a RAD Server resource defined as http://localhost:8080/employees
For this example, http://localhost:8080/employees we will get a Collection of Employee records from the Employees database. The table employee in the Employees database is a Collection of employee records. So in our RAD Server we will expose this as a Resource called employees. And this will be a Collection.
Also, if we wanted to only look at an individual employee record, we could specify this by adding the employee id to the end of the URL, like this: http://localhost:8080/employees/5
When we do this, we are now referring to a specific item in that resource.

4. So, let’s enter the name employees as our Resource Name on the RAD Server Package Wizard:

5. Next, for File type, we have the options to select Data Module, or Unit.
By selecting Data Module, this allows you to drag and drop FireDAC controls and FireDAC components onto a visual design layer, which is a Data Module.
If you select Unit, then you need to first instance those classes in the code at run-time.
For this example, we want to add FireDAC components at Design Time, so we will select Data Module as the File Type.
6. Click Next.
7. Next we see the RAD Server Package Wizard Endpoints page:

Here we are given the options of what REST Enpoints we want to implement: GET, GetItem, Post, PutItem, and DeleteItem.
8. We want to implement all the CRUD methods, so let’s select all the EndPoints:

Here we notice that GET is in two forms; GET and GetItem. The first GET returns the entire collection, and the GetItem will return a single item from the collection.
Similarly, the PUT method, is only available as a PutItem, meaning we will only be able to UPDATE one item at a time. And the reason for this, is we will be using the URL to specify the Item number. So we will have a single method to UPDATE the specified item.
And the same applies for the DELETE method. We will specify on the URL, which item we want to Delete.
9. Click FINISH.
The IDE now generates our RAD Server Package project for us!
10. Let’s Save this project into a New Folder, called RADServerCRUD
File | Save Project As | New Folder | RADServerCRUD
Default location: C:Users
In your RADServerCRUD folder save your Unit1.pas as uResourceModule.pas

11. Lastly, save the Project as RADServerCRUD.
File | Save Project As | RADServerCRUD

12. Your RADServerCRUD project should look like this:

13. File | Save All
Next, let’s look at the code that the RAD Server Package Wizard has created for us.
14. In the Project Manager, select the uResourceModule.pas
15. Select the Code tab in your IDE:
We see that we have our procedure for Get, GetItem, POST, PutItem, and DeleteItem.
And all of these procedures have the same prototype.
We have a Context, a Request, and a Response object as parameters.
procedure Get(const AContext: TEndpointContext; const ARequest: TEndpointRequest; const AResponse: TEndpointResponse);
The reason why these procedures all have these parameters is because the Request is going to carry up all of the data from the client to the RAD (EMS) Server. The Response is going to send the data back to the client. And the Context is a class that binds the Request and the Response with some authentication information.
For the RAD Server CRUD procedures we will be creating, we only need to concern ourselves with the ARequest and AResponse.
16. Let’s look at the GetItem procedure:
[ResourceSuffix(‘{item}’)]
procedure GetItem(const AContext: TEndpointContext; const ARequest: TEndpointRequest; const AResponse: TEndpointResponse);
We see the GetItem procedure has the same prototype as the Get procedure, with the same parameters, so where do we get the Item from?
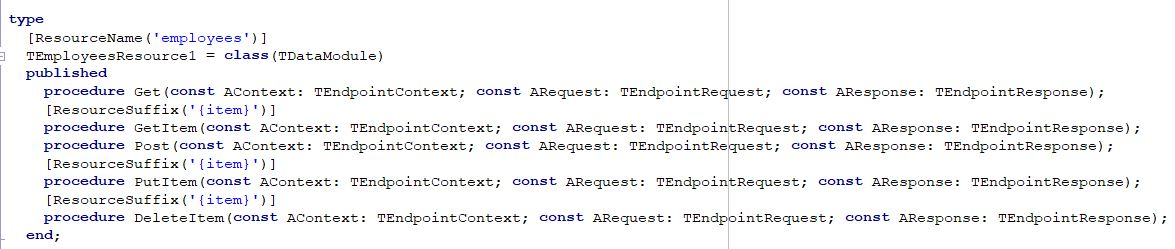
RAD Server has attributes. For example, if you look above the line for the class code, you see a ResourceName with the name ‘employees‘
type
[ResourceName(’employees’)]
TEmployeesResource1 = class(TDataModule)
And another attribute called ResourceSuffix with ‘{item}’ that is coded above the procedure GetItem:[ResourceSuffix(‘{item}’)]
procedure GetItem(const AContext: TEndpointContext; const ARequest: TEndpointRequest; const AResponse: TEndpointResponse);
And what this is telling the compiler is ‘employees‘ is the first part of the URL segment, after the address of the HTTP REST Server. So whatever your URL will be, for example: http://localhost:8080/employees is how we will get the employees resource from.
The very next segment on that URL is the item, and it differs in that it is not specified as a piece of text, but rather as a parameter.
And you can see that item is coded with the curly braces before and after the item, like this, {item}, telling us that item is a parameter, and not just part of the URL.
[ResourceSuffix(‘{item}’)]
17. Next, let’s look at the default generated GetItem procedure implementation from the RAD Server Package Wizard:

What we see in the above default generated GetItem procedure implementation is that it will get our item as a parameter, from the Request class: LItem := ARequest.Params.Values[‘item’];
And then we will send a response in the Response class, by setting a component of the Body of the Response, a Value will be set, to a JSON String , and that string will contain the string ’employees’ plus the item id passed as the parameter: AResponse.Body.SetValue(TJSONString.Create(’employees ‘ + LItem), True)
This means that when we call this GetItem procedure, passing item=5. all that will get returned is employees 5.
Also, at the end of our AResponse, we have a Boolean True. We always want to set this to True, which says that the object we passed in; TJSONString.Create(’employees ‘ + LItem), is owned by the Response, and that means the Response is responsible for releasing that object.
The reason why we want the Response to release the object is if we release the object ourselves, when we get to the end of this method, the response will be sent. But the Response class may depend on the class that we passed in, so if we freed the object ourselves, it would no longer be available. So, we just let the Response take care of disposing of that class.
18. Next if we look at the default generated Get procedure implementation:
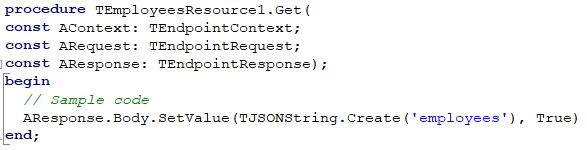
We see that it’s simpler than the Getitem procedure.
This Get procedure just outputs the string ’employees’. There is no item id to be forwarded out. So only the string ’employees’ get sent to the client.
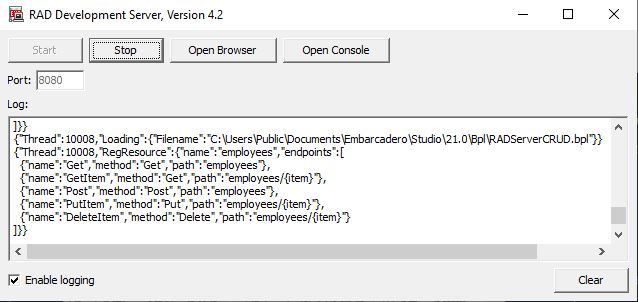
19. Next, let’s run this RADServerCRUD.bpl module.
We see our RAD Development Server starts, showing us the endpoints and REST endpoints we have in our RAD Server EMS Resource Module:
For development, we will use this RAD Development Server, that’s included in the Enterprise or Architect Editions of RAD Studio, Delphi and/or C++ Builder. But for production deployments, you will develop a Server Module that will be plugged into either a Microsoft IIS or the Apache Web Server, or into a Linux Docker Container. RAD Server Deployment Options are discussed here.
The RAD Development Server starts by running the $(BDS)binEMSDevServer.exe and passing in our RADServerCRUD.Bpl as a parameter. This can be seen, in your IDE, by selecting Run | Parameters:

The RAD Development Server is a stand-in HTTP Server, running locally on your Development machine either as a Win32 or Win64 application.
20. Next, let’s test our default REST Endpoints created by the RAD Server Package Wizard.
A convenient way to do this is to click on the Open Browser button on the RAD Development Server. This opens a Browser window for us. And the default URL we get is: http://localhost:8080/version
For this endpoint, ‘version‘ is the resource that gives the JSON (name-value pair) Response: {“version”:”4.2″,”server”:”RAD Server”}
The default RAD Server includes seven (7) pre-built endpoints Administrative built-in API of the RAD Server Engine with the following RAD Server resources described here: RAD Server Administrative API
Recall, when we ran the RAD Server Package Wizard, we created a resource called ’employees’

So, let’s take a look at what happens when we call our ’employees’ resource endpoint. The URL for our ’employees’ resource endpoint is: http://localhost:8080/employees
And this returns for us the Response “employees”
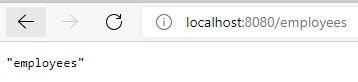
And this comes from executing our Get procedure that has the JSON string Response ’employee’:

And if we add an item to the Response “employees”, like employees/5, then this will execute our GetItem procedure, and gives us the Response: “employees 5”

And that comes from executing our Getitem procedure:

That returns the Response ’employees’ + item.
So, with the Getitem procedure, you can pass any item to the procedure, such as a GUID, Integer, or whatever you need to pass as the item.
Now that all of this is all working, in the next part 2 post, we will discuss modifying the default generated CRUD procedure implementations from the RAD Server Package Wizard for both Delphi and C++ Builder, to show how to implement Get, GetItem, Post, Put and Delete for a database table, and create Delphi and C++ Builder REST Clients to call our CRUD procedures.
Interested to deploy your server? Rapidly build and deploy services-based applications with the Rad Server’s IDE Software.


Reduce development time and get to market faster with RAD Studio, Delphi, or C++Builder.
Design. Code. Compile. Deploy.
Free Delphi Community Edition Free C++Builder Community Edition
