
There are over 472 million websites powered by WordPress. What most of them have in common is that they don’t benefit from the power of the web because WordPress is limited by its PHP structure. If you want to take your WordPress page or blog to the next level, then HTMX will be the right choice for you.
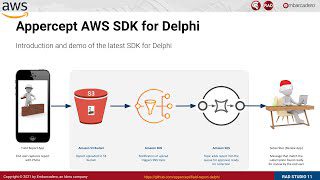
In this article, we are going to explore how to use HTMX in WordPress, by embedding the recent demo from our previous blog post onto an existing site. Just to recollect, this is what the demo looked like:

Our Delphi web server, powered by the WebBroker, had a few basic functionalities to return plain text and HTML strings, which were then swapped in the existing HTML by HTMX. With just a few slight changes we are going to be able to embed this entire application including all of its functionality into a WordPress blog, as its own post. We are also going to see how simple it is to add some more functionality.
Table of Contents
Why use HTMX in WordPress?
The basic premise was outlined at the beginning, but I want to highlight again how powerful this approach is. In this article, we will only be using a simple demo app, but there is so much more you can do. You can embed small snippets of code and entire applications, and you can also interact with WordPress actions. So the sky’s the limit, you can do anything beyond what WordPress can do. This is especially useful if you already have an existing WordPress site that needs a little polish or that you want to combine with your product.
Step 1: The Web Server
Let’s get started with our web server. The code of the last demo can be found here. There are just very few things that we will change here. First, we are not going to return the entire page’s HTML when starting the server, instead we are going to place this code into the WordPress post. So let’s delete the constant HTML in HTMLTemplates.pas and you can also delete the content of the TWebModule1.WebModule1DefaultHandlerAction method in WebModuleUnit1.pas.
Now let’s have a look at the remaining constants cSubmit and cEdit:
|
1 2 3 4 5 6 7 8 9 10 11 12 13 14 15 16 17 18 |
cSubmit = ''' <form hx-get="/edit" hx-swap="outerHTML"> <fieldset role="group"> <input type="text" name="edit" placeholder="Disabled. Click Edit" disabled /> <input type="submit" value="Edit ✏"> </fieldset> <kbd>%s</kbd> </form> '''; cEdit = ''' <form hx-post="/submit" hx-swap="outerHTML"> <fieldset role="group"> <input type="text" name="edit" value="%s"/> <input type="submit" value="Submit ✅"> </fieldset> </form> '''; |
The only thing we will need to change is the hx-get and hx-post attributes. In order to access the web server from the WordPress site, you will need to be hosting it somewhere. What we did is we set up a Linux virtual machine along with a domain and placed the web server application there. Then you can call the server from the outside, simply by using the URL. Let’s say you’re hosting the server on https://example.com. Then you are going to change the requests to this:
|
1 2 3 |
hx-get="https://example.com/edit" hx-post="https://example.com/submit" |
That’s all we are going to need for now. Now let’s head over to WordPress.
Step 2: WordPress
Adding HTMX
What you will need is a working WordPress site. This doesn’t have to be new and it doesn’t have to have the latest version. Actually, I want to point out that this technology is also especially interesting for old blogs, because all of the functionality happens on the web server. You will only need some initial HTML and the rest is covered by the server. You will need 0 lines of JavaScript and just 2 single lines of PHP.
The 2 lines of PHP are not going to be some complex code, this is only for adding HTMX and PicoCSS. As you remember, in the demo we added HTMX as a link inside the <head> tag in our initial HTML. This is not possible in WordPress. Instead, we are going to take advantage of one feature of WordPress: plugins. If you are an experienced WordPress and PHP developer, you probably won’t need a plugin, since you have access to the PHP of your site.
For most people using a plugin for code snippets will be much easier. There are a variety of free plugins available which you can simply install and use. For copyright reasons, I am not going to name the plugin we used, but it also doesn’t really matter. The best choice would be a plugin which supports adding the code snippets to specific blog posts instead of having them executed globally. I can say from experience that adding HTMX globally can cause issues, that’s why I recommend to only execute the snippet in the blog post where we will embed the application. The line of PHP looks like this:
|
1 |
wp_enqueue_script('htmx-script','https://unpkg.com/[email protected]/dist/htmx.min.js',array(),'1.9.12',true); |
Note that we are using the version 1.9.12. HTMX 2.0 has just been released, but there were changes in the configuration so HTMX will return an error in our demo. There is a fix for that, but we want to keep things simple for now, so we stick to 1.9.12.
Adding the post
For this demo we use a brand new and empty WordPress site, that’s why we embed the app in a new post. However, if you already have a WordPress site, and you want to embed your app in an existing post, then this is also definitely possible, this technology is very flexible.
We are going to add a new post now. Head over to the “Posts” section in the sidebar on the left. Click on “Add New Post” and WordPress will open the visual editor for you. Now that we have a new post, we can also make sure that the code snippet is only executed here in this post. You probably need to have a look at the options of your snippet where you can make this work in the plugin. In the plugin we used, it was also possible to use a shortcode control, this means that you have to add a shortcode control in the new post and add the ID of the snippet. The most important part is adding our HTML. In the post click on the “+” in order to add a block and search for “HTML”, as you can see in the screenshot below.

Click on the “Custom HTML” button and a new block is created, where you can enter HTML code and also preview it. Here we will enter our initial HTML code. In the original demo, the initial HTML was in the HTML constant, but we are going to slightly tweak it. Basically, everything we need is the <main> container. The rest can be dismissed. This is what it looks like:
|
1 2 3 4 5 6 7 8 9 10 11 12 13 14 |
<main class="container"> <h1 id="header">Delphi & HTMX Rocks!💃</h1> <button hx-get="https://example.com/helloworld" hx-target="#header">Click me</button> <hr /> <article> <h3>Another test</h3> <form hx-get="https://example.com/edit" hx-swap="outerHTML"> <fieldset role="group"> <input type="text" name="edit" placeholder="Disabled. Click Edit" disabled /> <input type="submit" value="Edit ✏"> </fieldset> </form> </article> </main> |
Especially if you want to use additional CSS, you might consider changing the “container” constant to something unique to the app, in order to avoid any duplicate classes with WordPress. Something like “embt-container” for example should be enough.
Before we continue we have to fix one unfortunate HTMX issue. Since we are calling our web server from our WordPress site, with the web server being hosted in a different location, CORS (Cross-Origin Resource Sharing) is an issue. HTMX handles CORS well generally speaking, but without setting an option it will send our request with wrong headers. To fix this, we have to add the following option to our main container:
|
1 |
<main class="embt-container" hx-request='{"noHeaders": true}'> |
Normally this option would need to be applied to every element which sends a request to the server, but since HTMX uses HTML inheritance, it is enough to add this option to the main container and it will be applied to all of its children.
If you now preview your site, and you have your web server up and running, then the demo should be working with all of its functionality. Isn’t that awesome?! We just embedded an HTMX app running with Delphi code in a WordPress blog. Without styles, the app should look like our first demo. So let’s add PicoCSS.
Adding PicoCSS
If you remember, PicoCSS is the CSS library that gave our demo a nice looking user interface. We are going to use it again, since it’s so easy to handle. But also note, if you ever want to add your own CSS, this is also definitely possible with WordPress.
Let’s go back to our code snippet where we added HTMX. Nearly the same way we added HTMX, we are also going to add PicoCSS. Again, with WordPress we can’t simply have PicoCSS as a link in our HTML head, that’s why we need to add it through PHP. You will have to add the following line:
|
1 |
wp_enqueue_style('PicoCSS', 'https://cdn.jsdelivr.net/npm/@picocss/pico@2/css/pico.conditional.min.css'); |
Note that the link to PicoCSS is a bit different than before, because we had to change one thing. PicoCSS uses a semantic HTML approach, which means that all the styles apply to all HTML elements. In WordPress this will mean that the styles are applied to the entire website. The styles are going to collide with the existing WordPress styles, and we don’t want that.
Fortunately, PicoCSS supports “conditional styling”, meaning that the styles will only be applied to containers having the “pico” class. Additionally, PicoCSS supports both light and dark theme, but our WordPress default site does not. That’s why we are going to only use the light theme. Let’s first change our HTML. We only need to edit the <main> container.
|
1 |
<main class="embt-container pico" data-theme="light"> |
Here we already changed the “container” class to something more unique and added the pico class. In HTML elements can have an unlimited number of classes, which are simply separated by a space. If you preview the site now, you should be able to see the app with all of its styles and all of its functionality. We successfully embedded the entire demo in a WordPress site! On our site, it looks like this:

Going the extra mile
Sanitizing the received data
So far, we haven’t paid much attention to security in our demo. When developing something web-related, we always must keep the “zero trust” state of mind. Even though this is just a very simple project and the data sent to the server is not even being stored anywhere, let’s see how we can improve the security.
At the moment, we are not escaping the data received by our service, which could potentially lead to Cross-site scripting (XSS) and other script injection techniques. To make our service fully safe, we simply need to escape the text we receive using the TNetEconding class you can find in the unit System.NetEncoding.
|
1 |
lResponse := TNetEncoding.HTML.Encode(Request.ContentFields.Values['edit']); |
Adding extra features
Just for the fun of it, I’m going to show you how easy it is to add additional features since all of our logic is inside Delphi code. What we are going to add is change our lame “Hello World” button and make it a bit more interesting. We will do this by adding a click counter and a random emoji generator every time the button is clicked.
Let’s first add the click counter. First off, simply add a field FClickCounter, which is an integer.
|
1 2 3 4 5 6 |
type TWebModule1 = class(TWebModule) ... strict private FClickCounter: Integer; end; |
When loading the site, which is our DefaultHandlerAction, set the counter to zero.
|
1 |
FClickCounter := 0; |
Every time the “Click Me” button is clicked, we want to increase the counter by 1.
|
1 2 3 4 |
procedure TWebModule1.WebModule1HelloWorldAction(Sender: TObject; Request: TWebRequest; Response: TWebResponse; var Handled: Boolean); begin Inc(FClickCounter, 1); end; |
Now the random emoji. Emojis are nothing more than decimal numbers in the UTF-8 or UTF-32 character sets. Therefore all we need to do is generate a random number between a certain range and we are going to get a random emoji. So let’s add a function RandomEmoji to our WebModule:
|
1 2 3 4 5 6 7 8 9 10 11 12 13 14 15 16 17 |
type TWebModule1 = class(TWebModule) ... strict private FClickCounter: Integer; function RandomEmoji: string; end; implementation ... function TWebModule1.RandomEmoji: string; var lRandomNumber: Integer; begin lRandomNumber := RandomRange(128512, 128592); Result := Char.ConvertFromUtf32(lRandomNumber); end; |
For this, you will need to add the units System.Character and Math to your uses clause. Now all that is left is to call the functions together in the HelloWorldAction.
|
1 2 3 4 5 |
procedure TWebModule1.WebModule1HelloWorldAction(Sender: TObject; Request: TWebRequest; Response: TWebResponse; var Handled: Boolean); begin Inc(FClickCounter, 1); Response.Content := 'Hello World!' + RandomEmoji() + ' - Clicks: ' + FClickCounter.ToString; end; |
Compile your server, run it and everything should be working! You see how easy it is to add additional functionality, without having to touch WordPress or HTML. It should be something like this, each time the button is clicked: 
Conclusion
Running code in WordPress is a technology not many people know about, but it is super powerful and has so many use cases. You are able to embed all of your apps in a WordPress site, or perhaps you will only use it to make your blog posts more fancy. With HTMX, everything is possible, and together with Delphi, you will get a high level of performance that you won’t get with many other languages.
In this article, we showed you how to use this technology for real-life purposes instead of just running it locally. The demo we created can be shipped immediately, live in WordPress, with such simple steps, without needing to be a WordPress expert. But WordPress is not the only use case. If you want to see what else you can do with HTMX, stay tuned for upcoming blog posts.
Article written by Elias Kassebaum.


Reduce development time and get to market faster with RAD Studio, Delphi, or C++Builder.
Design. Code. Compile. Deploy.
Free Delphi Community Edition Free C++Builder Community Edition


Interesting approach!
Instead of stripping all the headers from the request (
hx-request='{"noHeaders": true}'), wouldn’t it be more secure/appropriate to configure the web server to accept requests from a known domain?I haven’t tried it and I’m not any web or security specialist so I’m not sure if that would open a vulnerability or how an attacker would use it (maybe a “man in the middle”?).
Absolutely! CORS implementation should be a must and something to be taken care of in production environments. For this series of basic demos we are creating, to avoid adding a layer of complexity (as many users won’t even have an FQDN), we have tried to make the demos as frictionless as possible by stripping out bits that are not purely related to HTMX.
Thanks for your comment Yeray!
was thinking of using LAMP, but I have nothing here that is Linux… so, does that mean I must go with XAMPP? The articles I’m seeing really seem to focus on LAMP… If I need to go with XAMPP, how can I learn what is “different” about that… and does your article still apply? Thanks for your help.
Unless I have misunderstood you, I think you might have misunderstood what we’re doing in the article. You don’t need XAMPP as such. The Delphi part of the article runs its own server and serves up the HTML into the WordPress page. So, you need something that can run WordPress – and that could literally be anything from a regular WordPress site to a full-blown LAMP or XAMPP configuration, or even a container using something like Docker or a ‘Droplet’ on a web hosting company like Digital Ocean. The WordPress site gets content injected into it by the Delphi app, which could be running anywhere, as long as it’s reachable on the internet.
If I’ve misunderstood what you’re asking can you either rephrase it as a comment to this question or email me directly at [email protected] and I will see if I can help.