
Creating fast and reliable apps for iOS is very important for beginners and professionals alike whether they are developing C++ app for iOS or for any of the other operating systems and targets. C++ is subjectively the World’s most powerful programming language and consistently one of the world’s top three most popular programming languages. Thanks to its huge range of ready-made variables, functions, methods, namespaces and libraries it’s the do-everything toolkit which can be used for everything from regular simple apps to low-level operating system drivers, IoT hardware driving and everything in between. When a user wants to develop modern C++ applications, she or he will benefit from investing a very small amount of time in becoming familiar with the functions, features and shortcuts of a professional IDE. A small effort in that area pays dividends in productivity In this post we explain basic of C++ Builder as a guide for beginners.
Can you really create a C++ app for Apple’s iOS using a Windows PC?
Did you know that you can develop a C++ iOS App on Windows 11 with the latest RAD Studio / C++ Builder? RAD Studio with C++ Builder and Delphi is a great IDE and compiler running on Windows that supports multi-device applications for different platforms including iOS and you can develop native ARM applications like M1 CPUs too. So, your application’s program code can be recompiled so that it runs on everything from the latest Windows 11 version as well as on Apple ‘desktop’ devices such as the MacBook laptops, Mac Minis and iMacs using either Intel processors or the new M1 ‘Silicon’ CPUs. Yet that same program code can almost entirely be reused with little or no changes so it may be compiled for iOS where your apps can run on the very latest iPhone devices. Everywhere your users are, your C++ and Delphi apps can be.

In my opinion, because of its multi-device application and great tools of IDE, C++ Builder is the best C++ IDE Software and the best CLANG-based compiler that supports multi-device applications for all your needs including professional iOS application.
How to create a C++ program for iOS with RAD Studio IDE and C++ Builder?
C++ Builder is the easiest and fastest C and C++ IDE for building simple or professional applications on the Windows, macOS, iOS & Android operating systems. It is also easy for beginners to learn with its wide range of samples, tutorials, help files, and LSP support for code. C++ Builder comes with Rapid Application Development Studio, also known as RAD Studio, and C++ Builder is one of the most professional IDE’s that work under RAD Studio. It is the oldest IDE (it began as Borland TurboC in 1990 and was later renamed Borland C++ Builder). Under the Embarcadero brand, multiple new versions have been release, year upon year, along with great new features, updates, and support to ensure that your apps can stay current. RAD Studio’s C++ Builder version comes with the award-winning VCL framework for high-performance native Windows apps and the powerful FireMonkey (FMX) framework for cross-platform UIs. There is a free C++ Builder Community Edition for students, beginners, and startups.
More details about C++ Builder & RAD Studio for the beginners can be found in Official Wiki of Rad Studio.

You can download the free C++ Builder Community Edition here: https://www.embarcadero.com/products/cbuilder/starter.
Professional developers can use the Professional, Architect or Enterprise versions of C++ Builder. Please visit https://www.embarcadero.com/products/cbuilder.
See What’s New in RAD Studio 11
Download RAD Studio 11 Now
Here are the features of the C++ Builder CE version.
- Build Windows and iOS C++ Applications 10x Faster with Less Code.
- C++Builder Community Edition provides you with an integrated toolchain and professional-level developer tools from Day 1
- Featuring Clang-enhanced compiler, Dinkumware standard library, MSBuild/CMake/Ninja support, and popular libraries like Boost and Eigen.
- Develop Windows and iOS applications with a single codebase and responsive UI
- Enjoy the award-winning Visual Designer using the C++Builder VCL and FireMonkey frameworks for maximum productivity
- Built-in Debugging Tools that allow you to debug on any device
- Build database apps with local/embedded capabilities
- Hundreds of included components to enhance your app and reduce development cycles
- Direct access to InterBase, SQLite, MySQL, SQL Server, Oracle, PostgreSQL, DB2, SQL Anywhere, Advantage DB, Firebird, Access, Informix, MongoDB, and more.
- Licensed for use until your individual revenue from C++Builder applications or company revenue reaches $5,000 US or your development team expands to more than 5 developers
Getting to know the RAD Studio C++ Builder IDE
C++ Builder IDE has mainly 5 Parts, the Code Editor Window and Form Designer, Projects Window, Palette Window, Structure Window, Object Inspector Window. You can find more , less commonly used windows from the main IDE menu as well as the right-click context menus. All the basic sections can be summarized in this IDE picture;
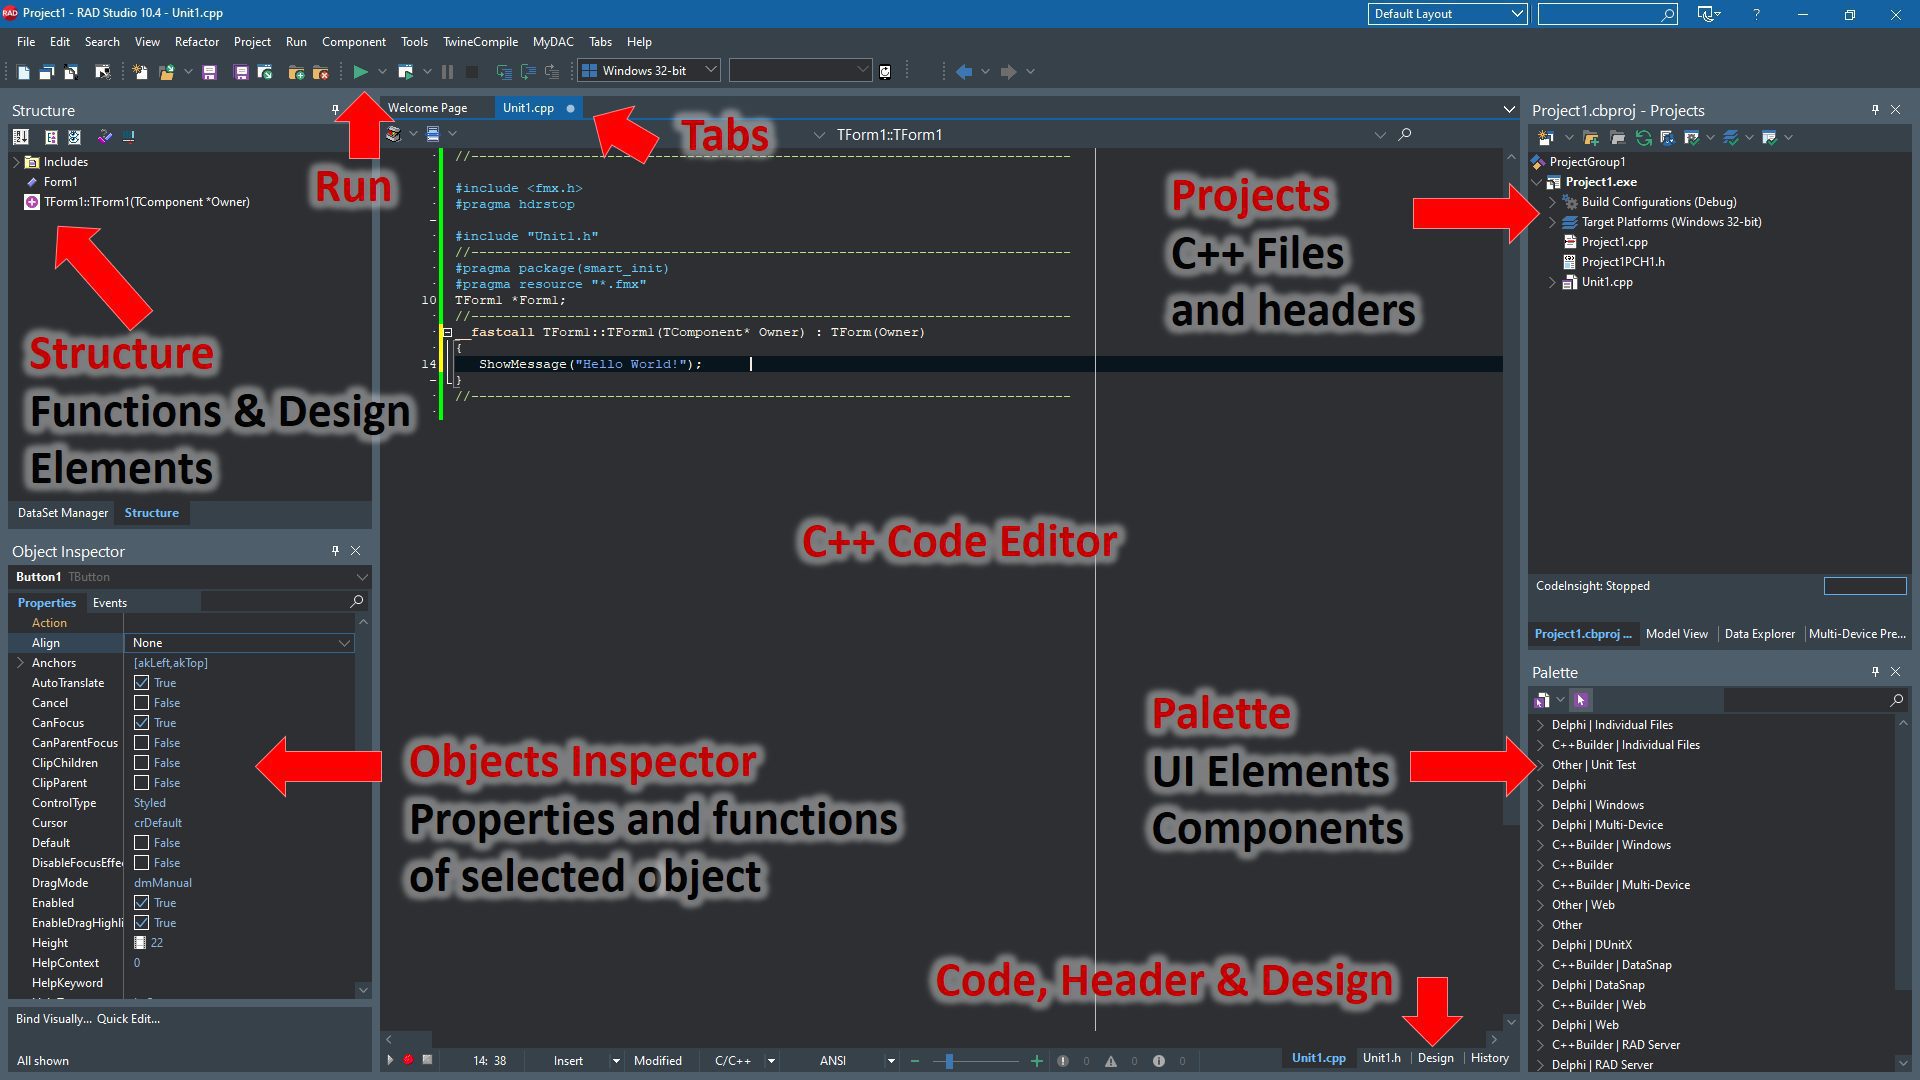
Now let’s explain each of these areas shown above.
1.The Code Editor and Form Designer: The Code Editor and the Form Designer occupy the center pane of the IDE window. The Code Editor is a full-featured, customizable UTF8 editor that provides syntax highlighting, multiple undo capability and context-sensitive help for language elements. You can switch between them by using F12 or from lower tabs in IDE. As you design the user interface for your application, RAD Studio generates the underlying code. When you modify object properties, your changes are automatically reflected in the source files.
2. The Project Window : The Project Window displays and organizes the contents of your current project group and any project it contains. You can perform many important project management tasks, such as adding, removing, and compiling files. The default location of the Projects window is the upper right corner of the IDE, but the window is dockable, as are many windows in the IDE
3. The Tool Palette Window: The Tools Palette Window has UI elements, components that can be used in application UI design, it assists with a new project, adds components to a form, or adds code snippets to the Code Editor.
4. The Structure Window: The Structure View Window displays a tree diagram that shows the hierarchy of elements in the active window (that is, the Code Editor or the Form Designer)
5. The Object Inspector Window: The Object Inspector is used to examine and edit the properties and events for the currently selected object or objects. Every design object (Components, UI Elements) can be edited by clicking on it then setting its properties and events in the Object Inspector Window.
Running C++ Code :You can Run your code by pressing F9 or Run button on the top bar. You can use other Run Without Debugging. There is a Stop and Pause button if your code is in loop. On the run time you can use debug, break points, watch variables and many other runtime features.
Switching between the Design and Code View: You can press F12 to switch between the Code Editor and Form Designer. The latest C++ Builder also allows you to use both of them together in the same screen. You can switch code, header and design view from the bottom top bars.
Switching Between the Code Files: You can use tabs on the top to switch between .c or .cpp files and .h headers.

How to create a C++ app project for iOS
C++ Builder greets you with a Welcome Screen. You can create a new project by using File->New menu on the top. By using this menu. You can create a new MultiDevice Application in C++ Builder with FireMonkey framework or a new Windows VCL Application in C++ Builder with VCL framework or you can create a Console Application in C++. There are more options to develop more professional static, dynamic libraries.
When you create a project this will create a Project source code file and a Unit which has a visual window. Your project will have .bpr, .cpp, PCH.h files, this project also includes two more .cpp and .h units. You can start designing your app with this ready-made unit as launching point, adding your own code by modifying these Unit files and its .h header. You can add more Units with new .cpp and .h files in your project..
How to create a C++ app for iOS running on an iPhone
Here are the full steps to develop iOS apps on Windows,
Download the free C++ Builder / C++ Builder Community Edition to develop an iOS C++ app on Windows
C++ Builder CE is the easiest and fastest Windows 10 development C & C++ IDE tool to develop simple or professional applications on iOS. It is also easy for beginners to learn with its wide range of samples, tutorials, help files and LSP support. C++ Builder comes with Rapid Application Development Studio, also knowns as RAD Studio, and C++ Builder is one of the most professional IDEs that work under RAD Studio.
You can download the free C++ Builder Community Edition here: https://www.embarcadero.com/products/cbuilder/starter.Professional developers can use the Professional, Architect or Enterprise versions of C++ Builder. Please visit https://www.embarcadero.com/products/cbuilder.
Install RAD Studio / C++ Builder with iOS platform support
Run RAD Studio Installer and during installation be sure that C++ Builder iOS Enterprise is checked as below. See Additional Options tab, select Samples and Help or any other options needed, then press Apply.

If you forget to install iOS support don’t worry, RAD Studio / C++ Builder allows you to install these packages from the IDE. Just run RAD Studio / C++ Builder go to Tools -> Manage Platforms … then check C++ Builder iOS Enterprise option. See Additional Options tab, select Samples and Help or any other options needed, then press Apply. This will Install the latest iOS development packages for the C++ Builder.
Create a new C++ multi-device project to allow your C++ app to run cross-platform
If you download C++ Builder Community Edition (or RAD Studio CE version) or any Professional, Architect, Enterprise versions of C++ Builder. Install it on your windows computer and run RAD Studio or C++ Builder.
1. Choose File->New-> “Multi Device Application- C++ Builder” menu

2. Select Blank Application to develop application with a blank form UI. You can add many UI components on it later.

3. Save all Unit File and Project file to a folder by using File -> Save Project As .. menu. For example: Folder name can be MyIOSApp and Unit file name MyIOSApp_Unit1.cpp and the project name MyIOSProject_Project1
In the C++ Builder project window, change your platform to iOS
On the right side there is Project window which lists platforms for this project. Multi-Device projects can be compiled for Windows, iOS or Android, the default is Windows 32-bit. To see these OS platforms, click the > icon on the left of Target Platforms section. This will show platforms, then double click to activate iOS Device 64-bit. After this all compilations will be done for the iOS platform. Anytime, you can back to Windows or Android and you can compile your project for that platform too.
Add the UI items you want to use in your C++ app to your form’s design
In C++ Builder, you can add your UI elements (also called as components) by dragging them from your Palette Window. There are many visual and non visual components for the C++ Builder. For example,
- Add Button (TButton) and Memo (TMemo) components to your Form (TForm) design by dragging these components from your Palette Window.
- You can set Style selector to iOS and View selector to an iOS Device.
- Double Click to Button1 on your Form Design. This will create OnClick() event of this Button which is Button1Click() event, a method runs when clicked. Here is a form example that we create as an iOS application.

Add your C++ code to develop iOS apps on Windows
Note that you can easily switch between UI Form Design and Code Area by using use F12 key. Or you can also use tabs below the IDE. You can easily switch between .cpp, or .h header code and Design.
If you did 3rd part of Step 4, now, you can modify inside of Button1Click() as given example below,
|
1 2 3 4 5 6 7 8 9 10 11 12 13 14 15 16 17 18 19 20 21 |
#include #pragma hdrstop #include "Unit1.h" //--------------------------------------------------------------------------- #pragma package(smart_init) #pragma resource "*.fmx" TForm1 *Form1; //--------------------------------------------------------------------------- __fastcall TForm1::TForm1(TComponent* Owner) : TForm(Owner) { } //--------------------------------------------------------------------------- void __fastcall TForm1::Button1Click(TObject *Sender) { UnicodeString ustr; ustr.printf(L"Hello, Pi is %8.3f",M_PI); Memo1->Lines->Add(ustr); } |
This example above is a modern “Hello World” example for iOS which runs with C++ Builder. Modern applications have a GUI. Note that VCL projects are Windows only. FireMonkey projects are Multi Device (multi-platform) applications that you can compile and run on Windows, MacOS, iOS and Android.
Install PA Server to enable a connection between your Windows PC and a Mac
The Platform Assistant server (named paserver) is a command-line application that can be installed on Windows, macOS, and Linux. You install the Platform Assistant on a remote system, in the same network as your development system, to let RAD Studio interact with that remote system, so that you can develop cross-platform (multi-device) applications for macOS, iOS, Linux, or Win64 (this last from a Win32 development system). The Platform Assistant allows you to develop multi-device applications and to debug applications remotely.
The Platform Assistant needs to be running and connected to the IDE in order for you to do the following:
- Run and debug multi-device applications remotely (Win64, macOS, iOS, Linux).
- Deploy multi-device applications (Win64, macOS, iOS, Linux).
- Add to RAD Studio a local copy of a macOS or iOS SDK, which is a prerequisite for developing Delphi or C++ applications for macOS, iOS or iOS Simulator (Delphi only).
Installing PA Server on Mac:
Here is the latest official link that explains how to install PA Server on a Mac device,
https://docwiki.embarcadero.com/RADStudio/Alexandria/en/Installing_the_Platform_Assistant_on_a_Mac
Running PA Server on Mac:
Here is the latest official link that explains how to run PA Server on Mac device,
https://docwiki.embarcadero.com/RADStudio/Alexandria/en/Running_the_Platform_Assistant_on_a_Mac
Installing the PAServer Manager on a Mac:
Here is the latest official link that explains how to install PA Server Manager on Mac device,
https://docwiki.embarcadero.com/RADStudio/Alexandria/en/Installing_the_PAServer_Manager_on_a_Mac
Acquiring Permission to Support Debugging on a Mac:
Here is the latest official link that explains how to acquire permissions to support debugging on a Mac device,
More about PA Server:
If you need to know more about PA Server for different Operating Systems please check this official page
Create a connection profile and compile your C++ app
If you installed PA Server successfully press F9 to run click Run with Debugging.
In the first time, it will as for the Connection Profile name for the PA Server. Give a name and then Enter your remote machine IP and passwords as below,

For the general usage in C++ Builder;
1. Run project by hitting F9 or click Run with Debugging.
2. If there is error, please check your code and act on any highlighted error lines.
3. If all is fine then save all project.
If you are a beginner “Hello World” examples are good to understand features of that programming language. It is good to understand how to edit text, how to write in its format, how to compile and link, how to debug and execute, and how to deploy or release the finished program. If you still have problem during these steps or you want to learn more about iOS development, follow this official link

You can download the free C++ Builder Community Edition here: https://www.embarcadero.com/products/cbuilder/starter.
Professional developers can use the Professional, Architect or Enterprise versions of C++ Builder. Please visit https://www.embarcadero.com/products/cbuilder.


Reduce development time and get to market faster with RAD Studio, Delphi, or C++Builder.
Design. Code. Compile. Deploy.
Free Delphi Community Edition Free C++Builder Community Edition
